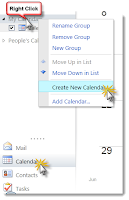
Creating a Calendar
- Click Calendar from the lower left corner of your Windows LIVE inbox
- Right-Click on My Calendars in the left column, and choose Create New Calendar ...
- Name your new Calendar (give it a different name than any of your other calendars!)
Sharing a Calendar (and granting others editing privileges)
- Select and right-click on the desired calendar
- Click Share
- Click Share this Calendar
- Enter the email addresses for the desired recipients (or click To... to select recipients from the Global Address Book)
- Be sure to select the appropriate option in the "Share" box before sending the email
- All information will allow recipients to see everything on the calendar
- All information with permission to add, edit, and delete will allow recipients (in district contacts only) to edit the calendar events.
- Send the email. The recipients will need to click the "Add Calendar" link in the email in order to have access.
You might also be interested in:
- Calendar Basics Video (1:41)
- Calendar Sharing & Meetings (3:36)


No comments:
Post a Comment