Don't Miss A Post!

Don't Miss A Post!
Showing posts with label Live. Show all posts

Monday, February 11, 2013

Security Questions for Your LIVE account

Update: These directions have been updated (2/20/13) to make it easier to access the password information options. All EM-S ISD users should complete this process prior to the transition to Office365.

In anticipation of our upcoming transition to Office365, it is important that all EM-S ISD users know their Live passwords. After our transition, EM-S ISD will no longer have access to these user accounts and will not be able to reset your passwords. Setting up a security question will be helpful in the event that you lose or forget your password in the future.

Sign in to live.com with your full email address and password. If you have it set to automatically log you in without entering a password, please sign out and sign back in again to verify that you DO know your password. 

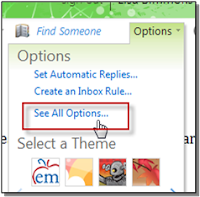
From the upper right corner of the screen, click Options > See All Options...


You will see a list of common shortcuts on the right side of the screen. Click the Change Your Password link. (You won't necessarily need to change your password, but this option will allow you to set up security questions/answers.)

If you are asked to re-enter your current password, please do so.


On the Account Summary page, click the "Edit security info" link under the Password and security info section. Adding a phone number and alternate email address is optional, but it does give another option if you ever need help getting back into this account. (Personally, I have not added a phone number, but I did add a personal email address.)


Under Security question, click Change. Choose your desired question and enter an answer that you will remember.

When finished, be sure to Save.


EM-S ISD is Upgrading to OFFICE365

Now you can save time and get more done with Microsoft®Office 365 for education— the email, web, and collaboration service. Offered as a free upgrade to Live@edu, Office 365 empowers you by delivering the tools you need to prepare coursework, create sophisticated reports and presentations, and collaborate over the web.
According to Microsoft, the total migration time will be about two days with downtime for each individual user lasting about an hour.
It is EXTREMELY IMPORTANT that you know your LIVE@Edu password prior to Feb 21, 2012.  If you forgot or need to reset your password follow the instructions in #2 below.
With Office 365, you will now have two different accounts:
1.       Office 365 - Email. You’ll continue to use Microsoft Outlook Web App or Microsoft Outlook to view and send email from your school account, but you’ll sign in athttp://outlook.com/ems-isd.net —using the same user name and create a new password. Please note: In Office 365 you won’t see our logo but Eagle Mountain-Saginaw ISD still administers this account.
·         Create a new password by signing in to https://eduupgrade.office365.com and follow the directions.
·         Once you have the password, access your email at this location: http://outlook.com/ems-isd.net .
·         Change your email password in any email apps (including Outlook) you use on your computer, tablet, or mobile phone to match your new Office 365 password.
·         Bookmark this address—Outlook Web App for email and calendar access: http://www.outlook.com/ems-isd.net  
2.       Personal Microsoft account. This personal account will give you access to all existing SkyDrive content, Messenger, and other Microsoft services. You’ll use the same user name and password to access this account that you do today to access Live@edu. Note that EM-S ISD no longer administers this account. As a result, we can’t reset its password for you. . Use https://account.live.com/ResetPassword.aspx to reset the password for your personal account.
·         Sign in to SkyDrive using your existing Live@edu user name and password
·         Bookmark this address: SkyDrive and Messenger: http://skydrive.com.


For additional information  - EMSISD LIVE - OFFICE365 

Monday, August 29, 2011

Creating a Group in Outlook 2010


A Contact Group, known in previous Outlook versions as a distribution list, is a grouping of email addresses collected under one name. A message sent to a Contact Group goes to all recipients that are listed in the group. EM-S ISD has a limit of 500 recipients per day with the email system. Please be mindful of this fact. You can include Contact Groups in messages, task requests, meeting requests, and in other Contact Groups.

Contact Group dialog box

There is no maximum number of names that you can include in a Contact Group. Again, email sent from an EM-S ISD address is limited to 500 recipients per day. The CONTACT group created below is located in the Contacts area of Outlook 2010 (or in the Contacts area of the web version). This is not a PUBLIC Group, but is contained in an individual's Contacts area in Outlook 2010 or the Web App system.


Create a Contact Group with new names or names in the Address Book
New Contact Group command on the ribbonFor Outlook 2010, in Contacts, on the Home tab, in the New group, click New Contact Group.
  1. In the Name box, type a name for the Contact Group.
  2. On the Contact Group tab, in the Members group, click Add Members, and then click From Outlook Contacts, From Address Book or New Email Contact.
  3. If you are adding a new email contact, enter the information for the person in the Add New Member dialog box.
If you are adding a member from Outlook Contacts or an Address Book, do the following:
  1. In the Address Book drop-down list, click the address book that contains the email addresses that you want to include in your Contact Group.
  2. In the list of names, click the names that you want, and then click Members. You can add names from different address books to the same Contact Group.
  3. Do this for each person whom you want to add to the Contact Group, and then click OK. The Contact Group is saved in your Contacts folder under the name that you give it.
Create a Contact Group by copying names from an email message
  1. In the message that you want to copy the names from, click the names in the To or Cc box (To, Cc, and Bcc boxes: A message is sent to the recipients in the To box. Recipients in the Cc (carbon copy) and Bcc (blind carbon copy) boxes also get the message; however, the names of the recipients in the Bcc box aren't visible to other recipients.).
  2. Right-click your selection, and then click Copy.
  3. In Mail, on the Home tab, in the New group, click New Items, then click More Items, and then click Contact Group.
  4. In the Name box, type a name for the Contact Group.
  5. On the Contact Group tab, in the Members group, click Add Members, and then click either From Outlook Contacts or From Address Book.
  6. At the bottom of the Select Members dialog box, in the Members box, right-click, and then click Paste.
Note:  A member doesn’t have to be in your Address Book to be added to the Contact Group. The member's name and email address are included when you copy and paste from the original email message.

Add a Contact Group received from someone
  1. When you receive a message that includes a Contact Group that you want to use, you can save it to your Contacts.
  2. Open the message that contains the Contact Group.
  3. In the To or Cc box, right-click the Contact Group, and then click Add to Outlook Contacts.
Add or delete a name in a Contact Group
  • In Contacts, open the Contact Group.  
  • Note: In list views, Contact Groups are marked with the Contact Group Button image icon.
Add an address from an address book or a contacts folder
  1. On the Contact Group tab, in the Members group, click Add Members, and then click From outlook Contacts or From Address Book.
  2. In the Address Book drop-down list, click the address book that contains the email addresses that you want in your Contact Group.
    • Browse for the name that you ant, or type it in the Search box.
    • In the Name list, click the name, and then click Members. Do this for each person whom you want to add to the Contact Group, and then click OK.
Add an address that is not in a contacts folder or an address book
  1. On the Contact Group tab, in the Members group, click Add Members, and then click New E-mail Contact.
  2. Type the information from the email address, and then click OK
Remove a name
  1. In the list of names, click the name that you want to remove
  2. On the Contact Group tab, in the Members group, click Remove Member

Friday, August 19, 2011

Setting up Outlook on your Teacher Computer

This is a cross-post from my own blog, Tech Tips and Such =)
I think I've been right along with everyone else in the craziness of this week. We had a wonderful convocation with an inspiring speaker, Mark Sharenbroich (see his story and more info at http://www.nicebike.com) and I know since then we've all been running full pace getting things ready and re-evaluating what we can do differently and improve upon. On the note of getting things ready...in our district we all came back to a wonderful addition on our computers, Microsoft Office 2010 (a special thank you is deserved to all of the technicians that worked hard through the summer to get this done). The application I'm going to give you steps for today is Microsoft Outlook 2010. This is a great way to streamline efficiency in your email program and much faster than accessing email through going to the website. It takes about a minute (yes I'm serious, one minute) to setup and it's super duper easy, so let's get started...


  1. Open Outlook 2010 (Go to Start > Programs > Office 2010 > Outlook 2010) 
  2. Click Next
  3. On the window that asks “Would you like to configure an Email account?  Select Yes and then Next
  4. Enter your account information for your Live Email.
    1. Make sure that you enter your complete email address. 
    2. Click Next 
  5. You will see Outlook process your account information, this should go pretty quickly. 
  6. If you see a window prompting you for your password, enter your Windows Live sign-in information.
    1. You will probably want to click for it to “Remember my password” but if you do this, just make sure you are on your personal or teacher dedicated computer, and that if you step away from your computer you lock it (Ctrl + Alt + Delete, Lock this Computer). 
  7. Next you should see a window that says “Your email account is successfully configured."  Click Finish. 
  8. When you are prompted with “Would you like to add a Hotmail Account?” Select No.
  9. Select to “Use Recommended Settings” and click OK.

Monday, June 20, 2011

Some Good Updates to Skydrive

There are some big updates that have come to SkyDrive. The updates make it easier to see and manage all of your documents.

The first difference I noticed is that with each file in your SkyDrive there is a small "i" icon to the right, that when clicked, displays a selection pane for the selected file. The next difference I observed was the massive improvement is speed of browsing through your files.

Take a look at the post below for more info.
SkyDrive Refreshed with New Features and HTML5

Friday, May 20, 2011

Technology Integration Conference THIS SUMMER!

We are super excited to be having our first Technology Integration Conference this summer on August 3rd & 4th! There will be sessions on Windows Live as well as many other cool technology tools and resources. For more info, check out the video below.

GoAnimate.com: Summer Technology Integration Academy 2011 by Becky501


Like it? Create your own at GoAnimate.com. It's free and fun!

Wednesday, May 18, 2011

Changing the Time Settings in LIVE

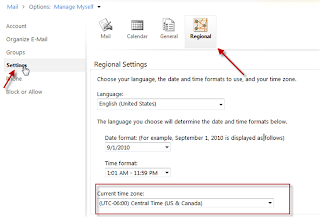
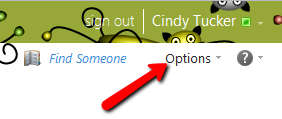
Time settings in LIVE can affect your use of the calendar and all of its features. IF the time is incorrect, click Options


and See All Options


Choose Settings and Regional to change the Time Zone

Tuesday, May 10, 2011

Creating a Shared Calendar

Creating a Calendar that can be shared by other EM-S ISD folks is easy to do.  This will be especially helpful for teams that plan together, campuses that want to create a "Computer Lab Check-Out Schedule" and more.

Creating a Calendar
  • Click Calendar from the lower left corner of your Windows LIVE inbox
  • Right-Click on My Calendars in the left column, and choose Create New Calendar ...
  • Name your new Calendar (give it a different name than any of your other calendars!)

Sharing a Calendar (and granting others editing privileges)
  • Select and right-click on the desired calendar
  • Click Share
  • Click Share this Calendar
  • Enter the email addresses for the desired recipients (or click To... to select recipients from the Global Address Book)
  • Be sure to select the appropriate option in the "Share" box before sending the email
    • All information will allow recipients to see everything on the calendar
    • All information with permission to add, edit, and delete will allow recipients (in district contacts only) to edit the calendar events.
  • Send the email. The recipients will need to click the "Add Calendar" link in the email in order to have access. 
You might also be interested in:

    Wednesday, May 4, 2011

    Organizing Email in Live.com (Part 1)

    This is a cross-post from Becky Burnett's blog, Tech Tips and Such...

    So this week has marked the beginning of using Windows Live (specifically live@edu) as our primary email service in our school district. In light of that, I thought I'd do a cross-post series for organizing emails in live.com. You have multiple options for organizing emails. You can assign categories, make an email a task, and/or put your emails in folders. For this post I'm going to go over sorting your emails into categories.

    To use categories in your email...
    • Hover your mouse on an email.
    • On the right side of the email bar you will see a grayed out rectangle, click it.
    • If you don't care about the names of the categories and just want to apply a color, then select a color to apply it to an email. If you wish to change the names/colors of your categories, click on Manage Categories and follow the steps below.
      • Delete the current categories by selecting them, then clicking Delete Category. Do this for all existing categories.
      • Click Create New Category and assign a color and name for the categories you want to have.
      • When you are finished, click OK and assign categories as described above.
    Note - You can apply more than one category to an email =)
    Another Note - You can filter by categories! At the top of your email just select Filter, then Category, and select your category.

    Monday, May 2, 2011

    We're "Going Live"!

    On Monday, May 2, EM-S ISD will transition from our current GroupWise email system to our new and improved Outlook LIVE online communication and collaboration services.

    You will begin receiving email in your Outlook LIVE mailbox as early as Monday evening, but the transition can take up to 48 hours. NO email will be lost during this change, but some messages may still appear in GroupWise during these first few hours and days. Please be sure to check email in Groupwise and Outlook LIVE next week to be sure you don't miss any important emails.

    Important:
    • Begin using your Outlook LIVE as your primary email account
      Tuesday, May 3. 
    • Check your email in GroupWise and Outlook LIVE all week.
    Thanks for making our transition to Outlook LIVE a great success! If you have any questions about our transition to Outlook LIVE please contact your CTI, Instructional Technologist, or Campus Repair Tech.

    Friday, April 29, 2011

    Spam in Windows Live

    As our transition to Windows Live is coming very soon we wanted to make sure that you understand that you will notice an increase in the amount of spam that you will receive at the beginning of this transition, however, this will not be the case forever. Windows Live must "learn" what is spam to those of us in EM-S ISD. To help speed up this process we're asking YOU to play a very important part...

    1. Don't just ignore the spam that you see in your email.
    2. Mark spam as spam by right-clicking on a spam email, then under Junk E-Mail choose Add Sender to Blocked Senders List.

    Monday, April 25, 2011

    Miss the Training?

    Did you miss the training on your campus or for your department on the new email system, or maybe you loved the training so much you'd like to see it again? Well we've got good news for you! Mary Fuller has been kind enough to put together a video that goes through the same presentation that was conducted in the district.

    Monday, April 4, 2011

    Accessing the District Address Book

    Accessing the District Address Book

    Are you looking for the address book? To access the address book in Windows live, open a new Message/Email.


    After you click New Message, click To.


    From the Default Global Address book, you can search by first or last name. 

    Changing Your Views in Live!


    Have you been trying to view your email the same way you did in Groupwise? You can do this by changing your view options.

    Changing Views in Live!
    With all the changes occurring in email, you can have some familiarity with setting up your email View options or change to the Windows Live way. You can view your email the traditional “Groupwise” way or by Conversation.
    To change your view to a traditional view, click the small arrow next to Conversations by Date. Then uncheck the conversation choice. This will list your email by date just as Groupwise did.

    However, you may enjoy the new format of having conversations grouped together. You can leave this option as it is and view the emails that are related to each other by subject.
    Another option under the View tab is to view the email in the window. You can choose to view the Reading Pane to the right or below.

    Thursday, March 31, 2011

    Changing your Display Name

    If you're one of those people who go by the lovely name their parents gave them, this probably isn't the post for you. However, if you're like me (and a lot of us!), you may go by another name. 

    Your email address was created back at the beginning of time (well, at least the beginning of email in the district) or when you were hired. In most cases, the email addresses were created using legal names. Your
    Display name is another matter. This is the name you would like to appear in address books, contact lists, and in the To/From field of emails. With Windows Live, you have the ability to change that Display name so people have an easier time finding you. 

    To change your Display name,


    • Click Options in the upper right corner of your Windows Live Mail page.

    • Choose See All Options ...

    • Click the Edit button in the lower right corner of the Account Information section.

    • Update your Display Name and Save.
    Remember that this is your professional education account, so be sure to change your Display name to the professional name you use. If you need to change your legal name, please contact Human Resources.

    If you have any questions about these or other option changes in Windows Live, please see your CTI, your IT, or leave a comment below.

    Logging in to LIVE

    To log in to your new EM-S ISD Live@EDU account, go to www.live.com. There is also a link available on the Employees page of the district site.

    On the right, under sign in, your username for all things LIVE (email, calendar, skydrive, etc.) is your FULL email address. 
    For your first time logging in, you will need to use the default password. If you do not know the default password, please contact your CTI or IT. If you have logged in before, please use the password you created.

    We're Going LIVE!

    Yep, the rumors you've heard are true ... we're going Live!   Windows Live, that is.

    Windows Live is Big. It's more than just email. It's more than just a calendar. It's a collection of online applications that EM-S ISD employees will begin using in May 2011. 

    The EM-S ISD Technology and Instructional Technology departments have been working hard to prepare for the transition from Groupwise to Windows Live. ITs and Tech Department representatives will be training all district employees during the month of April on this new system. 


    Check back here for regular updates, tips and tricks that will come in handy as you begin using your Live account. If you have questions you would like to be addressed here, please add a comment below. We look forward to answering your questions.


    ~EM-S ISD Instructional Technology Team