Don't Miss A Post!

Don't Miss A Post!
Showing posts with label Contacts. Show all posts

Monday, August 29, 2011

Creating a Group in Outlook 2010


A Contact Group, known in previous Outlook versions as a distribution list, is a grouping of email addresses collected under one name. A message sent to a Contact Group goes to all recipients that are listed in the group. EM-S ISD has a limit of 500 recipients per day with the email system. Please be mindful of this fact. You can include Contact Groups in messages, task requests, meeting requests, and in other Contact Groups.

Contact Group dialog box

There is no maximum number of names that you can include in a Contact Group. Again, email sent from an EM-S ISD address is limited to 500 recipients per day. The CONTACT group created below is located in the Contacts area of Outlook 2010 (or in the Contacts area of the web version). This is not a PUBLIC Group, but is contained in an individual's Contacts area in Outlook 2010 or the Web App system.


Create a Contact Group with new names or names in the Address Book
New Contact Group command on the ribbonFor Outlook 2010, in Contacts, on the Home tab, in the New group, click New Contact Group.
  1. In the Name box, type a name for the Contact Group.
  2. On the Contact Group tab, in the Members group, click Add Members, and then click From Outlook Contacts, From Address Book or New Email Contact.
  3. If you are adding a new email contact, enter the information for the person in the Add New Member dialog box.
If you are adding a member from Outlook Contacts or an Address Book, do the following:
  1. In the Address Book drop-down list, click the address book that contains the email addresses that you want to include in your Contact Group.
  2. In the list of names, click the names that you want, and then click Members. You can add names from different address books to the same Contact Group.
  3. Do this for each person whom you want to add to the Contact Group, and then click OK. The Contact Group is saved in your Contacts folder under the name that you give it.
Create a Contact Group by copying names from an email message
  1. In the message that you want to copy the names from, click the names in the To or Cc box (To, Cc, and Bcc boxes: A message is sent to the recipients in the To box. Recipients in the Cc (carbon copy) and Bcc (blind carbon copy) boxes also get the message; however, the names of the recipients in the Bcc box aren't visible to other recipients.).
  2. Right-click your selection, and then click Copy.
  3. In Mail, on the Home tab, in the New group, click New Items, then click More Items, and then click Contact Group.
  4. In the Name box, type a name for the Contact Group.
  5. On the Contact Group tab, in the Members group, click Add Members, and then click either From Outlook Contacts or From Address Book.
  6. At the bottom of the Select Members dialog box, in the Members box, right-click, and then click Paste.
Note:  A member doesn’t have to be in your Address Book to be added to the Contact Group. The member's name and email address are included when you copy and paste from the original email message.

Add a Contact Group received from someone
  1. When you receive a message that includes a Contact Group that you want to use, you can save it to your Contacts.
  2. Open the message that contains the Contact Group.
  3. In the To or Cc box, right-click the Contact Group, and then click Add to Outlook Contacts.
Add or delete a name in a Contact Group
  • In Contacts, open the Contact Group.  
  • Note: In list views, Contact Groups are marked with the Contact Group Button image icon.
Add an address from an address book or a contacts folder
  1. On the Contact Group tab, in the Members group, click Add Members, and then click From outlook Contacts or From Address Book.
  2. In the Address Book drop-down list, click the address book that contains the email addresses that you want in your Contact Group.
    • Browse for the name that you ant, or type it in the Search box.
    • In the Name list, click the name, and then click Members. Do this for each person whom you want to add to the Contact Group, and then click OK.
Add an address that is not in a contacts folder or an address book
  1. On the Contact Group tab, in the Members group, click Add Members, and then click New E-mail Contact.
  2. Type the information from the email address, and then click OK
Remove a name
  1. In the list of names, click the name that you want to remove
  2. On the Contact Group tab, in the Members group, click Remove Member

Tuesday, May 10, 2011

Creating a Shared Calendar

Creating a Calendar that can be shared by other EM-S ISD folks is easy to do.  This will be especially helpful for teams that plan together, campuses that want to create a "Computer Lab Check-Out Schedule" and more.

Creating a Calendar
  • Click Calendar from the lower left corner of your Windows LIVE inbox
  • Right-Click on My Calendars in the left column, and choose Create New Calendar ...
  • Name your new Calendar (give it a different name than any of your other calendars!)

Sharing a Calendar (and granting others editing privileges)
  • Select and right-click on the desired calendar
  • Click Share
  • Click Share this Calendar
  • Enter the email addresses for the desired recipients (or click To... to select recipients from the Global Address Book)
  • Be sure to select the appropriate option in the "Share" box before sending the email
    • All information will allow recipients to see everything on the calendar
    • All information with permission to add, edit, and delete will allow recipients (in district contacts only) to edit the calendar events.
  • Send the email. The recipients will need to click the "Add Calendar" link in the email in order to have access. 
You might also be interested in:

    Sunday, May 1, 2011

    Importing Contacts to LIVE

    Take a look in your LIVE Address Book and you will notice that all of the district contacts have already been uploaded. In just a few steps, you can export any non-district email addresses from Groupwise and import them into your Contacts in LIVE.

    GROUPS and ADDRESS BOOKS in Groupwise need to be addressed differently. If you have not created any GROUPS in Groupwise, skip down to the steps for Importing/Exporting Address Books. If you have created GROUPS, please follow both sets of instructions below.

    -----------------------------------------------------------------------------------------------------------

    Saving Contacts from GROUPS in Groupwise
     Groups do not import correctly into LIVE, so you will need to follow the directions below (video or written instructions) to create an Address Book for all of the contacts in your groups.

    Reminder: This process will not work in Groupwise 7 (what you likely have on your desktop).
    The first step in the process is to run the Groupwise 8 application from the Novell Delivered Application window.


    -----------------------------------------------------------------------------------------------------------
    Exporting ADDRESS BOOKS from Groupwise and Importing them to LIVE


    Monday, April 4, 2011

    Accessing the District Address Book

    Accessing the District Address Book

    Are you looking for the address book? To access the address book in Windows live, open a new Message/Email.


    After you click New Message, click To.


    From the Default Global Address book, you can search by first or last name. 

    Thursday, March 31, 2011

    Changing your Display Name

    If you're one of those people who go by the lovely name their parents gave them, this probably isn't the post for you. However, if you're like me (and a lot of us!), you may go by another name. 

    Your email address was created back at the beginning of time (well, at least the beginning of email in the district) or when you were hired. In most cases, the email addresses were created using legal names. Your
    Display name is another matter. This is the name you would like to appear in address books, contact lists, and in the To/From field of emails. With Windows Live, you have the ability to change that Display name so people have an easier time finding you. 

    To change your Display name,


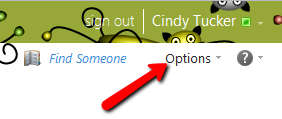
    • Click Options in the upper right corner of your Windows Live Mail page.

    • Choose See All Options ...

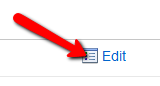
    • Click the Edit button in the lower right corner of the Account Information section.

    • Update your Display Name and Save.
    Remember that this is your professional education account, so be sure to change your Display name to the professional name you use. If you need to change your legal name, please contact Human Resources.

    If you have any questions about these or other option changes in Windows Live, please see your CTI, your IT, or leave a comment below.